分类 折腾=-= 下的文章

此前安装了Linux Mint20.2Uma,后续升级到了20.3Una,现在基于Ubuntu 22.04 LTS的Mint21 Vanessa已经可用了!(关于vanessa还有另一个词条:https://zh.moegirl.org.cn/Vanessa(Cytus_II)#)
我没有看到官方对于“Vanessa”的解释,但是可以参见ThinkBabbyNames的解读:
as a girls' name is pronounced va-NESS-ah. It is of Greek origin, and the meaning of Vanessa is "butterfly". The name of a genus of butterflies that includes the Red Admiral and the Painted Lady. Also possibly an early-18th-century literary name of English origin created by Jonathan Swift for "Gulliver's Travels" as a pseudonym for Esther Vanhomrigh, based on the first syllable of her surname, and possibly the Latin verb "esse", meaning "to be"

- 阅读剩余部分 -

这是我写的DS18B20用户态驱动

Goodspeed最近好像比较清闲,所以这位有点闲的同学跑来远程我的OrangePi Zero2 完成了一份正经的单总线驱动。实现后效果如下:

root@orangepizero2:~# cd /sys/bus/w1/devices/28-0721c061a6ac/
root@orangepizero2:/sys/bus/w1/devices/28-0721c061a6ac# ls
alarms eeprom_cmd hwmon power temperature
conv_time ext_power id resolution uevent
driver features name subsystem w1_slave
root@orangepizero2:/sys/bus/w1/devices/28-0721c061a6ac# cat w1_slave
bb 01 4b 46 7f ff 0c 10 74 : crc=74 YES
bb 01 4b 46 7f ff 0c 10 74 t=27687

显而易见大约27摄氏度,详细过程会在他的博客写好后在下方公开。(人比人气死人:)

给香橙派 Zero 2 适配 1-wire 总线

给香橙派 Zero 2 适配 1-wire 总线————William Goodspeed
在向Goodspeed抱怨此事之前,香橙派官方4群里邹明燊先生也曾经写过一个dts文件,也是根据其他已经支持1-wire的设备简单改写的(如下),但是我通过orangepi-add-overlay xxx.dts 添加后会在日志中看到错误信息,即我上一篇文章里写被占用的哪些错误信息,并且经过测试dts生成的dtb文件没有正常工作。而Goodspeed提供的截图中可以看到,这个dts文件并没有写错,只是设置的GPIO不同。

/dts-v1/;
/plugin/;

/ {
    compatible = "allwinner,sun50i-h616";

    fragment@0 {
        target = <&pio>;
        __overlay__ {
            w1_pins: w1_pins {
                pins = "PC9";
                function = "gpio_in";
            };
        };
    };

    fragment@1 {
        target-path = "/";
        __overlay__ {
            onewire@0 {
                compatible = "w1-gpio";
                pinctrl-names = "default";
                pinctrl-0 = <&w1_pins>;
                gpios = <&pio 2 9 0>; /* PC9 */
                status = "okay";
            };
        };
    };
};

二者的主要不同在于Goodspeed是在 arch/arm64/boot/dts/allwinner/overlay/Makefile 中加入一行 sun50i-h616-w1-gpio.dtbo,make dtbs让构建系统编译新的 overlay,而邹明燊先生试图让我直接通过orangepi-add-overlay将改写好的单总线支持dts文件编译并自动添加到overlay路径。
这两者方法不太一样,Goodspeed的方法是从orange-pi-5.16-sunxi64 linux分支源码中自动编译生成dtbo文件,而邹明燊先生是自己写dts从写好的dts去编译得到dtbo文件。但是不知道为什么后者无法生效,从内核日志里的报错看是和pinctl冲突了,也就是说比pinctl抢先占用了pin,但是理论上应该先由pinctl统一管理,驱动应该基于pinctl运行。从这点看,由linux分支源码去自动编译可能会得以避开这一问题,但是具体避开抢占问题的原理就不得而知了,我也不打算深究。

Goodspeed编译好的单总线设备树overlay文件

prebuilt-dtbs.tar

关于linux设备树,请参考如下内容深入浅出理解Linux设备树(DTS)
Dts:DTS即Device Tree Source,是一个文本形式的文件,用于描述硬件信息。一般都是固定信息,无法变更,无法overlay。
Dtsi:可以理解为dts的公共部分,添加、变更非常灵活。Dtsi包含在dts中。
Dtb:Dtb编译出来的二进制
Dtbo:Overlay编译出来的二进制
dtbo-base:指定overlay是以哪个dtb为base来覆盖的。
Node:树的节点
Property:属性

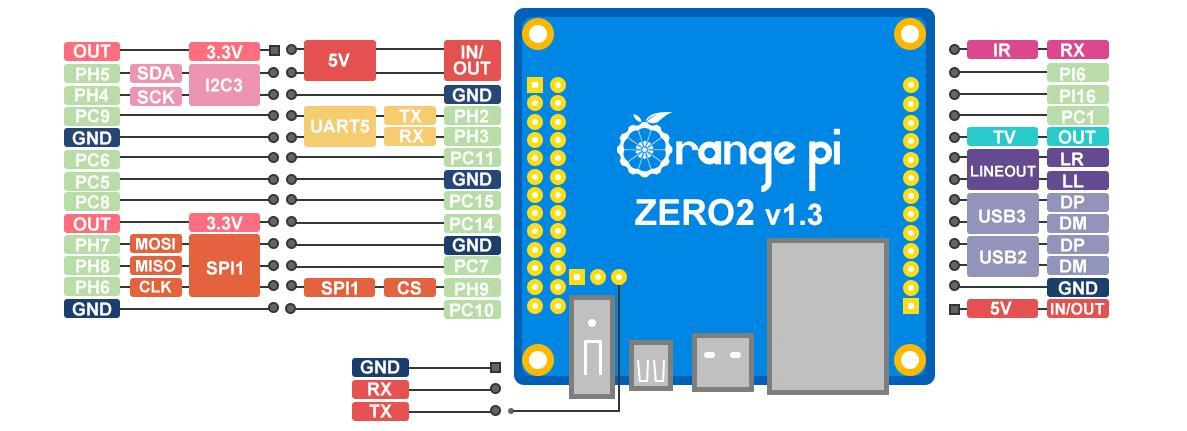
OrangePiZero2IO 2022-07-11T10:09:56.png

研究一番发现官方没有现成的单总线驱动可用,必须得自己写一个驱动驱动单线设备。

 +------+-----+----------+------+---+  Zero 2  +---+------+----------+-----+------+
 | GPIO | wPi |   Name   | Mode | V | Physical | V | Mode | Name     | wPi | GPIO |
 +------+-----+----------+------+---+----++----+---+------+----------+-----+------+
 |      |     |     3.3V |      |   |  1 || 2  |   |      | 5V       |     |      |
 |  229 |   0 |    SDA.3 |  OUT | 1 |  3 || 4  |   |      | 5V       |     |      |
 |  228 |   1 |    SCL.3 |  OUT | 1 |  5 || 6  |   |      | GND      |     |      |
 |   73 |   2 |      PC9 |  OUT | 1 |  7 || 8  | 1 | OUT  | TXD.5    | 3   | 226  |
 |      |     |      GND |      |   |  9 || 10 | 1 | OUT  | RXD.5    | 4   | 227  |
 |   70 |   5 |      PC6 |  OUT | 1 | 11 || 12 | 1 | OUT  | PC11     | 6   | 75   |
 |   69 |   7 |      PC5 |  OUT | 1 | 13 || 14 |   |      | GND      |     |      |
 |   72 |   8 |      PC8 |  OUT | 1 | 15 || 16 | 1 | OUT  | PC15     | 9   | 79   |
 |      |     |     3.3V |      |   | 17 || 18 | 1 | OUT  | PC14     | 10  | 78   |
 |  231 |  11 |   MOSI.1 |  OUT | 1 | 19 || 20 |   |      | GND      |     |      |
 |  232 |  12 |   MISO.1 |  OUT | 1 | 21 || 22 | 1 | OUT  | PC7      | 13  | 71   |
 |  230 |  14 |   SCLK.1 |  OUT | 1 | 23 || 24 | 1 | OUT  | CE.1     | 15  | 233  |
 |      |     |      GND |      |   | 25 || 26 | 1 | OUT  | PC10     | 16  | 74   |
 |   65 |  17 |      PC1 |  OUT | 1 | 27 || 28 |   |      |          |     |      |
 |  272 |  18 |     PI16 |  OUT | 1 | 29 || 30 |   |      |          |     |      |
 |  262 |  19 |      PI6 |  OUT | 1 | 31 || 32 |   |      |          |     |      |
 |  234 |  20 |     PH10 | ALT3 | 0 | 33 || 34 |   |      |          |     |      |
 +------+-----+----------+------+---+----++----+---+------+----------+-----+------+
 | GPIO | wPi |   Name   | Mode | V | Physical | V | Mode | Name     | wPi | GPIO |
 +------+-----+----------+------+---+  Zero 2  +---+------+----------+-----+------+

端口占用情况:
已占用:
PC1,pin PC1 already requested by onewire@0; cannot claim for 300b000.pinctrl:65
PC5,pin PC5 already requested by onewire@0; cannot claim for 300b000.pinctrl:69
PC9,pin PC9 already requested by onewire@0; cannot claim for 300b000.pinctrl:73
PC6, pin PC6 already requested by onewire@0; cannot claim for 300b000.pinctrl:70
PC8,pin PC8 already requested by onewire@0; cannot claim for 300b000.pinctrl:72
PC10,pin PC10 already requested by onewire@0; cannot claim for 300b000.pinctrl:74
PC11,pin PC11 already requested by onewire@0; cannot claim for 300b000.pinctrl:75
PC12,PC13是两个板载LED
PH3,w1-gpio onewire@0: gpio_request (pin) failed

主板、4G 单条DDR3 SO-DIMM、DC5.52.5 to ATX电源转换板咸鱼210包邮。(咸鱼老哥还随板子送我了块没天线的M.2[PCI-E]的2.4Ghz网卡) 机箱咸鱼40包邮 85新Sinoc NAS小机箱(尺寸:24.523*15 还内置了一个音响可惜对我没什么用,预制硬盘槽可装1块2.5寸固态,2块3.5寸HHD)

- 阅读剩余部分 -

最近新买了一个鼠标(锐普Gm90 有线+2.4Ghz无线+蓝牙5.0)替换原来的蓝牙4.0鼠标(Q9 蓝牙4.0+2.4Ghz无线双模),新设备并不能像旧设备一样在两个系统下无缝切换;切换系统必须删除设备重新配对链接。
网上有很多相关的实现,基本原理是修改替换Linux/Windows的配对信息,使两个系统配对信息保持一致,让鼠标完全将其识别为同一匹配设备。但是不同蓝牙版本,配对信息不完全相同,从3.0 -> 4.0就新增了几个参数,而4.0- 5.0是否还有新增参数目前尙不明了,SEO靠前的国内平台大多只有带货的广告帖子,几乎找不到有用的技术分析。我愿称之为开源分享技术上的东亚病夫:)
参考文章:
Linux 与 Windows 双系统共享蓝牙鼠标-南浦月
Bluetooth Pairing on Dual Boot of Windows & Linux Mint/Ubuntu - Stop having to Pair Devices
Dual Boot Bluetooth Pair

- 阅读剩余部分 -

Microsoft Edge和Google Chrome同理。

问题症状

启动了代理工具(如Steam++)并手动设置了系统代理
export ALL_PROXY="socks5://127.0.0.1:8868"
执行env|grep -i proxy得到回显当前的代理准确无误,但是浏览器无法正常使用(据说FireFox可能可以自动识别到系统代理?)
启动浏览器打开设置->高级->系统->打开您计算机的代理设置 浏览器跳转到chrome://linux-proxy-config页面,页面内容如下:

在受支持的桌面环境中运行Chromium时,将使用系统代理设置。但您的系统不受支持,或启动系统配置时出现问题。
但您仍可通过命令行进行配置。如需详细了解各项实验功能和环境变量,请参见 man chromium。

之前我一直不在意这个提示,但是今天凌晨突然很想解决代理不生效的问题,所以仔细回来看了看提示。
好吧,不支持当前桌面环境,那么我们按照提示全找找man chromium写了什么。
在proxy相关里有如下内容:

--proxy-server=host:port
       Specify the HTTP/SOCKS4/SOCKS5 proxy server to use for requests.

       This overrides any environment variables or settings picked  via
       the  options  dialog.   An  individual proxy server is specified
       using the format:

         [<proxy-scheme>://]<proxy-host>[:<proxy-port>]

       Where <proxy-scheme> is the protocol of the proxy server, and is
       one of:

         "http", "socks", "socks4", "socks5".

       If  the  <proxy-scheme>  is omitted, it defaults to "http". Also
       note that "socks" is equivalent to "socks5".

       Examples:

         --proxy-server="foopy:99"
             Use the HTTP proxy "foopy:99" to load all URLs.

         --proxy-server="socks://foobar:1080"
             Use the SOCKS v5 proxy "foobar:1080" to load all URLs.

         --proxy-server="socks4://foobar:1080"
             Use the SOCKS v4 proxy "foobar:1080" to load all URLs.

         --proxy-server="socks5://foobar:66"
             Use the SOCKS v5 proxy "foobar:66" to load all URLs.

       It is also possible to specify a separate proxy server for  dif‐
       ferent URL types, by prefixing the proxy server specifier with a
       URL specifier:

       Example:

         --proxy-server="https=proxy1:80;http=socks4://baz:1080"
             Load https://* URLs using the HTTP proxy "proxy1:80".  And
       load http://*
             URLs using the SOCKS v4 proxy "baz:1080".

--no-proxy-server
       Disables  the proxy server.  Overrides any environment variables
       or settings picked via the options dialog.

--proxy-auto-detect
       Autodetect proxy configuration.  Overrides any environment vari‐
       ables or settings picked via the options dialog.

显然,我们得手动在Chromium启动参数上加上设置代理的参数。按照上面的例子,我应该添加如下参数:
--proxy-server="socks://127.0.0.1:8868"
所以,编辑桌面快捷方式(后缀为.desktop),找到Exec这行,改为:
Exec=chromium %U --proxy-server="socks://127.0.0.1:8868"
记得保存,大功告成,去试试你的代理吧!

如果关闭代理工具后浏览器访问网络产生异常,建议去复制一个新的快捷方式而不是直接修改原有的启动文件。
截图_2022-05-04_01-48-55.png

设计目的是方便在H&G里打狙。顺带一提,我忘了怎么制作外挂了(也许写的出挂我就用不上这个了)。

功能要素

  1. 一个小准星,几个像素点聚集在一个点的就可以。
  2. 按键调整是否显示
  3. 按键调整准星位置
  4. 保持准星在游戏画面内稳定显示不过渡遮挡按钮

预期实现方法

python3 tkinter 像素级超小带色无边框窗口

具体实现:

from contextlib import suppress
from tkinter import *
from keyboard import *
root=Tk()
root.title("crosshair")
x = round(root.winfo_screenwidth()/2-2)
y = round(root.winfo_screenheight()/2-2)
root.geometry("4x4+{}+{}".format(x,y))
root.resizable(0,0)
root.overrideredirect(True)
root.config(bg="#7cfc00")
root.lift()
root.attributes("-topmost", True) #保持准星窗口在顶层
root.wm_attributes('-topmost', 1)
hook_key("end", root.destroy)
def autoadjust():
    x = round(root.winfo_screenwidth()/2-2)
    y = round(root.winfo_screenheight()/2-2)
    root.geometry("4x4+{}+{}".format(x, y))

hook_key("home",autoadjust)

root.mainloop()
print("hello")
unhook_all()